|
||||||||||||||||||||||||
The Live Content Studio Manager is a PC installation, installed via an MSI, and only for those creating the content. By default, the applications are installed in Program Files (x86)\TutorPro Ltd. Users with access to the Live Content Manager tool will need to “Run As Administrator” to ensure that updates can be applied. To do this follow these steps: 1.Navigate to C:\Program Files (x86)\TutorPro Ltd\Live Content Studio in Windows Explorer 2.Right click on the file TutorPro Live Content Studio.exe and Create Shortcut to the Desktop 3.Right click on the new shortcut on the desktop and select 'Properties' -> 'Advanced' 4.Select Run as administrator 5.Click OK and OK again It is possible to run Live Content Studio from your user profile to eliminate the need to "Run as Administrator" for updates. On installation of Live Content Studio you have an option to select the installation folder. Make this your user profile and you should have full access to all files making the update process more seamless. For Example: C:\Users\[USERNAME]\AppData\Roaming\TutorPro Ltd\Live Content Studio |
If you are creating assessments, you will need a location on your network where all users have Write Permissions to save their results on completion of the assessment. |
Live Content for the End-User
|
|||||||||||||||
Installation checklist❑Download the Live Content Launcher MSI. This program allows users to seamlessly Launch content created in Live Content Studio.
❑Install the MSI to a test group on the network. Confirm this works for the test group by using this test Launch page ❑Install the MSI firm-wide. ❑As you create new Live Content, ensure it is enabled for the Live Content Launcher MSI. ❑(NOT required for new Clients after November 2020) Update all Live Content created before installing the Live Content Launcher MSI. ❑Intellek LMS Clients must book a one hour session with team Intellek to convert any Live Content on the LMS to work with the Launcher MSI. During this session you will be asked to share your screen. You will identify a select few courses in your LMS for Intellek to update and for you to test with the new installation. On the same call, if all is ok, Intellek will perform the necessary steps to update all Live Content in the Intellek LMS. ❑If you use another LMS or alternate methods of distributing Live Content, that content will need to be converted. Please contact [email protected] for steps to convert Live Content in your special circumstance.
|
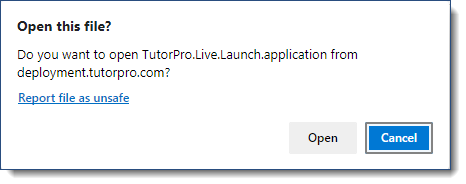
MSI Installation When installed, the Live Content Launcher MSI unpacks the necessary files to the following location: C:\Program Files (x86)\TutorPro Ltd\TutorPro Live Launch This folder contains TutorPro.Live.Launch.exe and TutorPro.Live.Content.exe and their associated binaries. UpdatesUpdates are to be made in one of two ways: 1.Manually on the Client’s system by the IT team as they normally would schedule software updates. An Intellek Live Content update schedule will be put in place, so they know when to look. 2.Auto-updates are also available for the program as has been the case with ClickOnce to the user Roaming Profile. If this is your preference use the Auto-Update enabled MSI. Registry updates – URL ProtocolIn addition to the installation of the appropriate files, registry entries are made in the following location: Computer\HKEY_CLASSES_ROOT\tutorpro-live-content This registry entry contains the following information: URL Protocol: Indicates that this registry entry is to be looked at when the link in the web page is clicked. The link is as follows: tutorpro-live-content: Shell\Open\Command provides the link to the installed program on the user’s computer in Program Files (x86) as stated above. On runningThe process is as follows: 1.Learner clicks on a link in the LMS that presents them with a Live Launch web page 2.The Live Launch button contains the link ‘tutorpro-live-content:’ followed by the information that has always been there indicating the location of the web page itself that contains the assessment which is commented out at the bottom of the HTML document. Open one up and take a look. 3.Clicking the link instructs the browser to inquire upon the registry entry as mentioned above. The registry entry contains the information about the location of the EXE to run. 4.TutorPro.Live.Launch.exe is executed with the info in the HTML passed to it as a parameter. 5.Launch.exe decides where the location of Content.exe is and passes the command line parameter to it. 6.Content.exe uses the parameter passed in to locate the HTML page and extract the Assessment. 7.Content.exe runs the assessment. |
For clients using the updated Live Content Launcher, Live Content will run via any Windows-based browser. ClickOnce Technology We have phased out ClickOnce support as of Q2 2021. If you have not yet updated your Live Content launching technology, the following will apply: Otherwise: The standard Microsoft ClickOnce technology is natively supported in Internet Explorer and MS Edge (pre 2020 release). Firefox does not support the Microsoft ClickOnce technology. Google Chrome requires the installation of an add-in. Edge Chromium To enable ClickOnce support in Edge Chromium: 1.Enter edge://flags in the Edge Chromium browser address bar. 2.Scroll down to the ClickOnce Support setting and select Enable from the dropdown list. 3.Restart the browser. Users may see this pop up when launching Live Content. If you receive the following message, click Open.
|
XenDesktopNo plugin is required for Live Content to run in a XenDesktop session. XenApp - Accessed from server (typical)To use Live Content support for applications delivered to the user via the XenApp Accessed From Server model, the Intellek Virtualization Server Plug-in for the Citrix ICA Client must be installed on the XenApp Server and the Intellek Virtualization Client Plug-in for the Citrix ICA Client must be installed on each end-user’s machine.
|