Feature Enhancements & Bug Fixes 
Available Dec 12, 2024
NEW
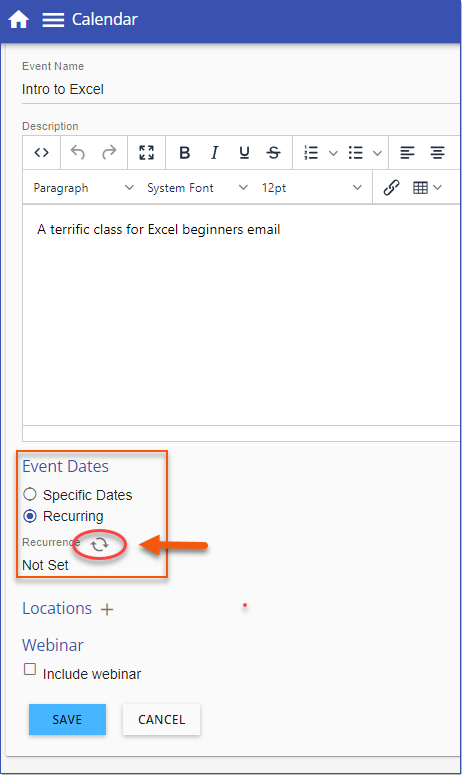
The Calendar now includes a Recurrence Option that can be applied to Events relative to the Event Start Date. This option allows administrators to set up recurring Events based on customizable intervals such as weekly, monthly, or yearly. By selecting recurrence, multiple instances of an Event can be generated automatically, eliminating the need for manual entries. 1.Navigate to the Calendar > Add Event page. 2.Click Select, search for and select the scheduled Course. 3.Under Event Dates, select the Recurring radio button. 4.Click Edit Recurrence
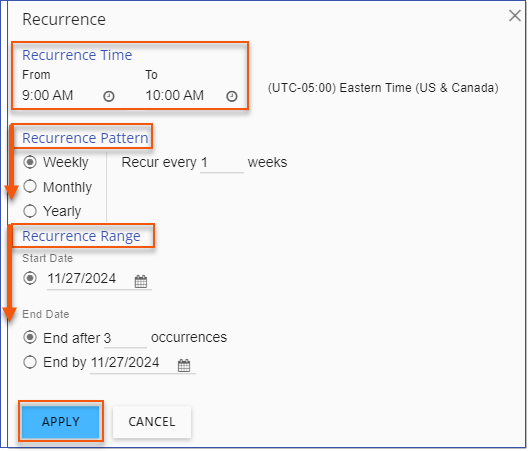
5.Specify the Recurrence Options: oSet the duration of the Events using the From and To Recurrence Time fields. oSet the recurrence interval by choosing a Recurrence Pattern of Weekly, Monthly, or Yearly and specifying the number of times per unit of time. oUse the Recurrence Range to specify the Start Date for the first Event occurrence. Use the End Date options to determine either the number of occurrences to schedule or the End by date when the final Event will be scheduled. oClick Apply to save the Recurrence details to the Event.
6.Fill in the remaining Event Details as necessary and click Save to save the Calendar Event. The LMS will generate an Event for each date that meets the recurrence criteria. Individual Events can be edited as needed. |
The Bulk Import History process now offers the ability to import all User History statuses for Calendar Events. Bulk Import User Event HistoryAdministrators can use the Bulk Import History process to Import User Attendance history for Calendar Events. This is particularly helpful when you have an external attendance list, like one from Teams or Zoom, and need to transfer the User attendance information to a specific Calendar Event for tracking purposes. The process involves exporting the Event's User history to an Excel file, making necessary changes to the data (updating status), adding any additional User attendance information, then re-importing the updated file to refresh the event's attendance records. 1.Navigate to the Calendar Event > Users tab and select the 3-dot option menu 2.Select Export User Attendance from the menu to generate an excel template with the necessary columns and format for bulk importing User history. Save the template and enter the User Attendance data into the appropriate columns. Any existing Users are included in the exported file. a.Note the following details when adding User history to the excel file: ▪Client_User_Identifier must match the User ID in the LMS User account. ▪Location must be entered accurately as per the LMS Locations. ▪Enter a valid Event Status in the status column. Capitalize each word with no spaces. For example, 'No Show' is entered as 'NoShow', Enrolled, Finished, Waived, Passed, Failed, Cancelled, etc. ▪If a match exists for a User in the existing Event attendance, the import will update the record, i.e. change 'Enrolled' to 'Finished'. b.Save and close the exported file. 3.Select the 3-dot option menu > Import User Attendance to import the updated User Attendance. The bulk import process will process the records and update the Event User history with the data supplied in the import file. If there are any problems along the way the import will display any errors at the top of the Uses page. 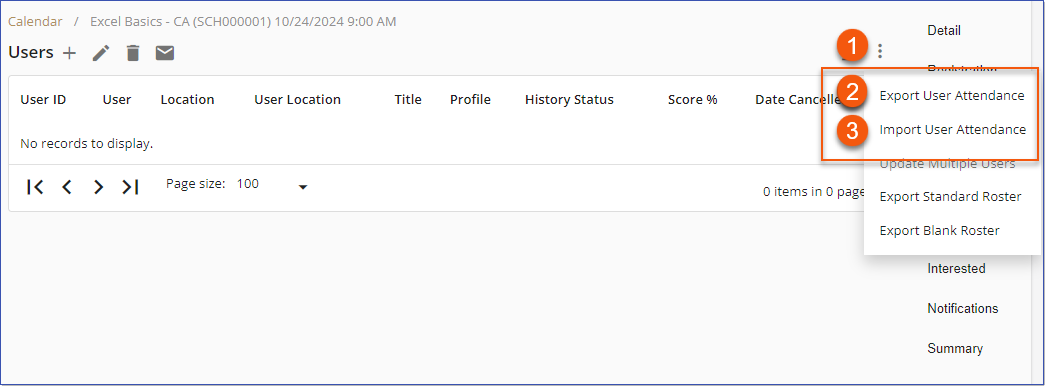 Bulk Import User Event History |
Administrators can utilize the Bulk Import History process to import User history for Courses available in the LMS. 1.Download and complete the details of the Import User History - Internal LMS Course History template as follows:  Import User History - Internal LMS Course History a.Enter User ID in the ClientUserIdentifier column for each imported User history. b.Enter the Course Identifier, Course Name and Course Type Code (see below) for each imported course history. c.Enter the Score, if applicable, and History Status for each imported course history. Enter a valid History Status, capitalizing each word with no spaces. For example, 'In Progress' is entered as 'InProgress'. ▪The following history statuses can be imported: Finished, In Progress, Failed or Passed. Failed or Passed statuses require a History Score.
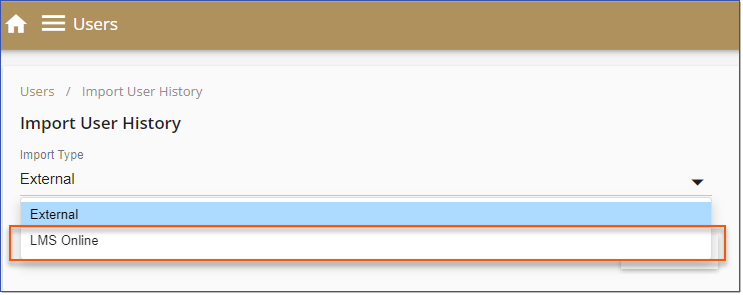
2.Navigate to Users > 3 dot menu > Import User History. 3.Select the Import Type LMS Online.
4.Click Select to browse for the downloaded Import UserHistory - Internal LMS Course History template. 5.Click Upload to complete the history import. |
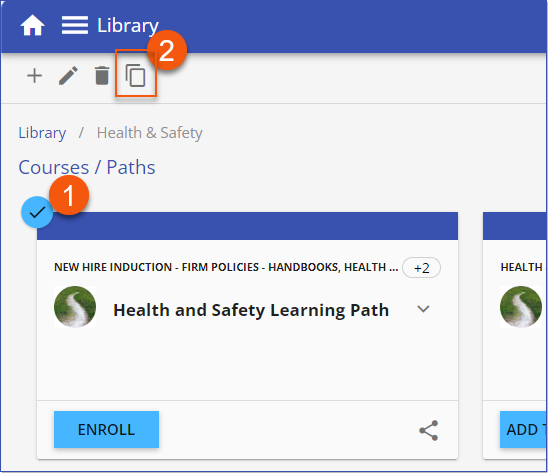
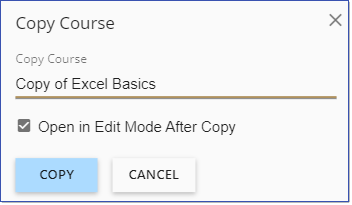
The LMS now includes the option to copy a Course within the Library. The copied course retains the original details and attributes but excludes data from the Structure tab, as well as History and Assignments. 1.Navigate to the Library and select a single Course Card. 2.Select Copy
3.Enter a new name for the copied Course. 4.Select Open in Edit Mode After Copy to open the Course at the Course Detail Page.
5.Click Copy. The LMS will create a copy of the Course with all the data excluding the data in the Structure tab, History and Assignments, Paths and Compliance. |
Additional fields are now included in the Training Tracking Report exported file. The additional columns of data include Event Name (where applicable), User’s Start Date, Course Sub-delivery and User's Manager Email Address are included in the export. 1.Navigate to Run a Report. 2.Select Training Tracking Report. 3.Select desired criteria and click Search. 4.Click the Export to Excel Training Tracking Report - Export to Excel |
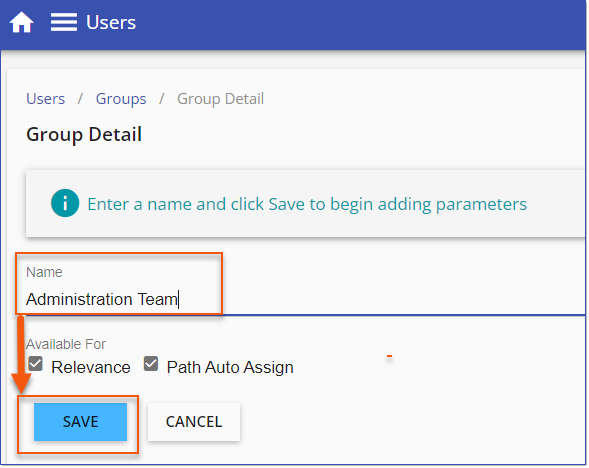
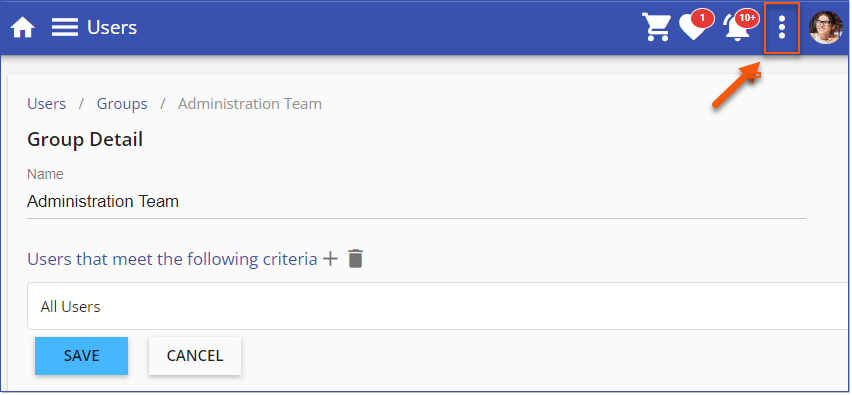
Administrators can use the Manager parameter when creating Groups or Access Groups. the Manager is available from the Parameter Name drop-down. the LMS will display all Mangers in the Values drop-down. Administrators select which Managers the group is based on, and the group will dynamically populate the group with all Users who report to the selected Manager(s). 1.Navigate to the Users > 3 dot option menu > Groups or Access page. 2.Select Add New Record 3.Enter a Name for the Group and click Save to begin adding parameters.
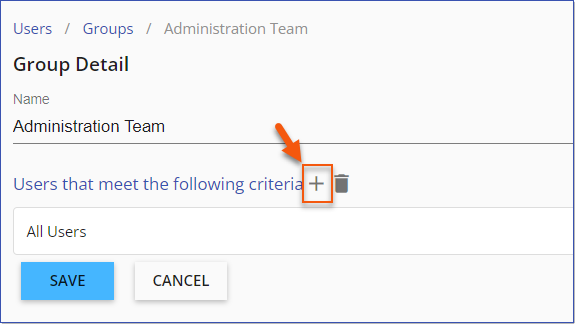
4.Select Add to specify the criteria.
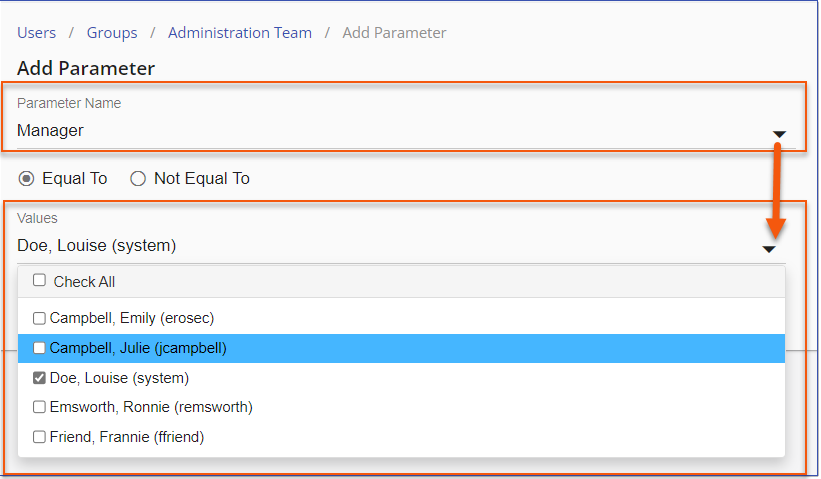
5.Select Manager from the Parameter Name drop-down. 6.All available Managers display in the Values drop-down. Select all desired Values for the new Group.
7.Save the Group. The LMS will create a Group of users who have the chosen values as their Manager.
|
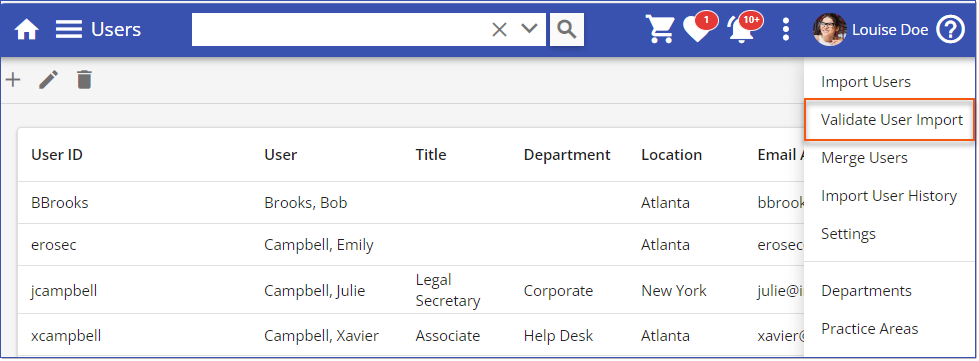
A new feature has been introduced that allows Administrators to validate User data prior to importing it into the LMS. The Validate User Import option allows you to check CSV, XLSX, or JSON.TXT data for proper formatting and structure before importing it. 1.Navigate to Users > 3 dot menu. 2.Select the Validate User Import menu option. 3.Click Select to browse to the CSV, XLSX or JSON.TXT file. 4.Select Upload to validate the file. The LMS returns the results, either passing validation or displaying any errors encountered.
5.Once validated, use the Import Users menu option to import the User data. API Reference The API Post /users endpoint now includes an optional validateOnly Boolean parameter. When passed as true the LMS will validate the data but will not import it. When passed as false (default value) or omitted the data is imported. |
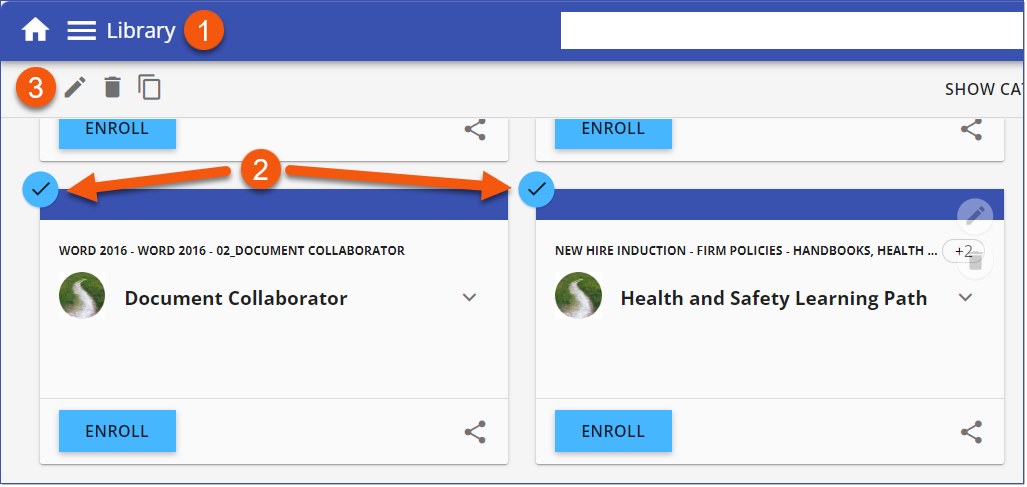
The Library now offers additional Bulk Edit options for managing and editing Learning Paths. Administrators can select multiple Learning Paths and using the Bulk Edit tool, modify the Record Status, Categories, and Auto-Assignment settings for selected paths. 1.Navigate to the Library. 2.Select multiple Learning Paths in the Library. 3.Click the Edit record pencil to open the Bulk Edit tool.
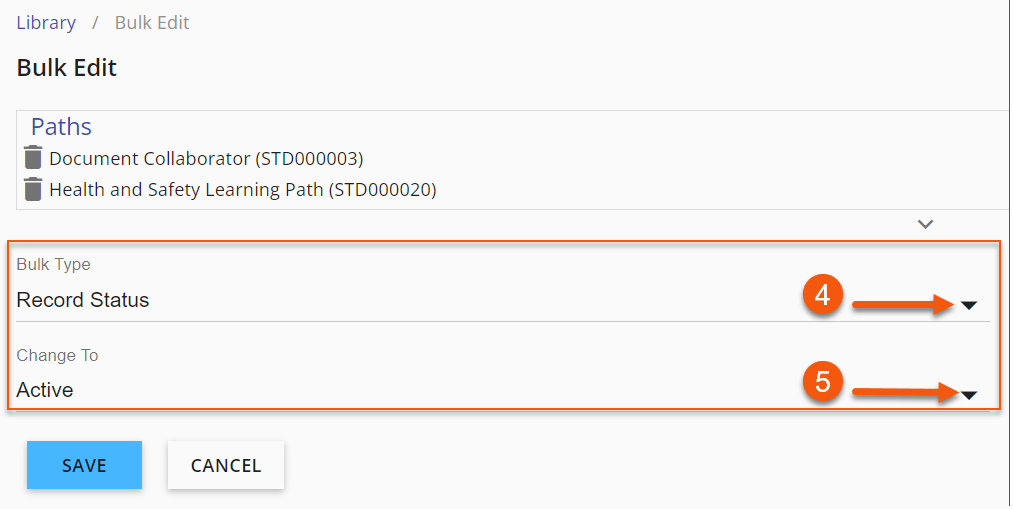
4.In the Bulk Type drop-down, choose from the new available options as described below. 5.Use the Change To drop-down to select the desired option/status for the selected Learning Paths.
Bulk Edit Types:oRecord Status - Administrators use the Change To drop-down to change the Record Status for the selected Learning Paths to Active/Inactive status. oCategories - This bulk type allows administrators to choose one or more Categories from the available list and update the selected learning paths accordingly. oAuto Assign - Use this bulk type option to set up automatic assignment of selected learning paths to the chosen Groups. The Groups selected in the Change To drop-down will overwrite any existing auto assignments for the selected learning paths. 6.Save the changes.
|
----------------------------------------------------------------------------------------------------------------
Any Issues listed below this line were added after Nov 26, 2024 when LMS v3.66.0.0 Release Notes were originally made available.
----------------------------------------------------------------------------------------------------------------
ISSUES RESOLVED:
•Add History plus sign available in scheduled course.
•Multiple notification emails being sent out. (19137, ShepW)
•Compliance history not registering.
•Disabled Allow Users to Add History permits Users to add history to learning record. (17307, CDH)
