Off-site compliance events can be added at any time by LMS Administrators or User Managers, provided the Compliance module has been activated. End-users can add their own external compliance history if the Allow users to add CLE history check box is selected on the Users page > three dot Options menu > Settings > Compliance History.
To add history on behalf of a User:
1.Navigate to the Users page.
2.Locate the appropriate user, and then click the User ID. Alternatively, click in the row and then click Edit record ![]() .
.
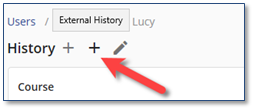
3.Click the History tab.
4.Hover over the Internal History ![]() icon to display the External History
icon to display the External History ![]() icon.
icon.
5.In the History Detail page, enter the appropriate details:
a.Type the name of the course attended.
b.Use the Open calendar popup and Open the time view popup icons to enter the start and end dates and times for the course.
c.If the course meets compliance requirements for one or more compliance bodies, click the ![]() button to select the appropriate body or bodies.
button to select the appropriate body or bodies.
![]() If the course applies to more than one compliance body to which you are assigned, click the Add Body
If the course applies to more than one compliance body to which you are assigned, click the Add Body ![]() icon immediately below the Body selection arrow to add the course to an additional body.
icon immediately below the Body selection arrow to add the course to an additional body.
d.Click the Accreditation Type arrow to select the appropriate option. Accreditation types are limited to those that have been associated with the selected compliance body.
e.In the Credit Amount field, enter the amount of credit time awarded to you (in hours) by the course.
f.Add any additional Notes, if applicable.
6.Click ![]() Save.
Save.
![]() If the Compliance Module has been set to require approval for user-added history, a notification will be sent to the appropriate individual for approval (see Managing External Compliance Participation).
If the Compliance Module has been set to require approval for user-added history, a notification will be sent to the appropriate individual for approval (see Managing External Compliance Participation).
•Courses pending approval will display in the user’s In Progress card on the Home Dashboard.
•Users can access their learning history by clicking the Learning Record card on the Home Dashboard or clicking the Menu icon and navigating to the Learning Record page.
•Once approved, the course will be added to the user’s Compliance tab with the appropriate credits and the Learning Record > Courses tab as a Finished Course.
•If declined, the course will only be added to the user’s History tab as a finished Course with a status of Declined.