If the three default Event Contact Types provided in the LMS are not sufficient for your needs, you can create additional Contact Types in the Event Contact Type Manager.
![]() To create Event Contact Types, you must have the appropriate Security Profile permissions to edit User accounts.
To create Event Contact Types, you must have the appropriate Security Profile permissions to edit User accounts.
Please keep in mind that the list of available Contact Types will show in both the User details page and in the list of available Event Contacts when working with Events on the Calendar. For those reasons, we recommend that you keep the number of Event Contact Types simple and concise for ease of use and consistency when assigning Contacts to Events. |
1.Access the Users page in the LMS.
2.Select Event Contact Types from the three dot Options menu.
3.Click the Add a new record ![]() button on the toolbar.
button on the toolbar.
4.Enter a unique Event Contact Type Code.
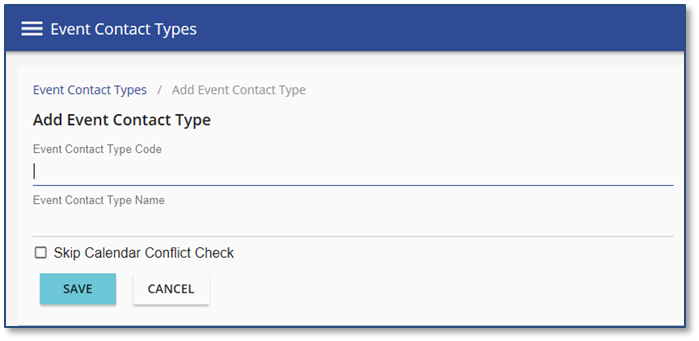
![]() The Event Contact Type Code must be unique to all other Codes within the LMS. To keep things simple, the Code can be the same name as the Event Contact Type Name. Only the Event Contact Type Name will display when appropriate.
The Event Contact Type Code must be unique to all other Codes within the LMS. To keep things simple, the Code can be the same name as the Event Contact Type Name. Only the Event Contact Type Name will display when appropriate.
5.Enter the Event Contact Type Name.
![]() The Name should be descriptive and easily identified. Examples might include Presenter or Outside Speaker. This name can be seen when applying the Contact Type in the User details and when assigning Event Contacts for Scheduled Training Events on the Calendar.
The Name should be descriptive and easily identified. Examples might include Presenter or Outside Speaker. This name can be seen when applying the Contact Type in the User details and when assigning Event Contacts for Scheduled Training Events on the Calendar.
6.Check Skip Calendar Conflict Check if the user can be scheduled as a contact for simultaneous events. When checked , no conflict check occurs and no warnings display for overlapping events.
7.Click ![]() .
.