1.Display the Style Manager page.
2.Click the +ADD STYLE button.
3.The Style Editor dialog box displays. Select the appropriate settings for the style.
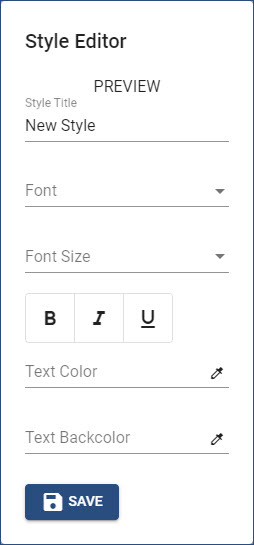
•The Preview area displays how the selected settings will display in instruction frames.
•Click the Style Title line, and then enter the name for the style.
•For both the Font and Font Size settings, click the arrow to select the appropriate option.
![]() As a best practice, select a sans serif font (e.g., Arial, Calibri, Tahoma, Trebuchet, Verdana), rather than a font that has serifs (e.g., Times New Roman or Garamond) or a script font (e.g., Lucida Handwriting or Brush Script). The font size should be easily legible on a computer screen, such as a minimum size of 12 points.
As a best practice, select a sans serif font (e.g., Arial, Calibri, Tahoma, Trebuchet, Verdana), rather than a font that has serifs (e.g., Times New Roman or Garamond) or a script font (e.g., Lucida Handwriting or Brush Script). The font size should be easily legible on a computer screen, such as a minimum size of 12 points.
•Use the B, I, and U buttons to turn on Bold, Italics, and/or Underline, respectively.
•For the Text Color and Text Backcolor, click the eye-dropper icon to set each color. If you know the HEX code, type it directly on the appropriate field, preceding it with the # symbol. (See the Setting Colors topic.)
4.Click the SAVE button to save the style.
Important! Clicking outside the Style Editor dialog box before clicking the SAVE button will close the dialog box WITHOUT saving any changes, in effect, canceling any and all changes! |