The Style Manager is a repository for all styles that will be used to format instruction text in content files. Access to the Styles Manager is available from the Menu panel. All items in the Styles Manager are available and accessible to all authors within the organization. For that reason, discuss with the team which styles should be created, how they should be formatted, and then document the decisions in the Standards Guide.
Consider creating a style for each of these instances: •Default. Use this style for general, standard instruction text. This style will also be handy after applying a different style (e.g., Term or Action). •Title. This is for the first instruction/frame in a content file. This style should likely have a larger font size, bold, possibly a different font color, and different alignment (e.g., centered) than standard text. •Term. Used to identify ribbon buttons, icons, software application names, etc. It is common to include a color and bold to this type of style. •Action. Used to identify when a user is supposed to perform a task or action. Attributes might include bold, italics, or a background (highlight) color. •Content Navigation. Used to identify a Progress button in the Live Content instruction/frame Header bar, rather than a control/button/icon in an application. •Score. Used to set-off the user's score in practice or Assessment content files. It is common to enlarge the font size and possibly the color. Use the Style Title in the Style Editor to appropriately identify each type of style with an easily-identifiable name. |
Individual styles display as "cards." The name of the style displays in the top left of the card, and a preview of how the style is formatted displays in the center of the card. Icons to Edit (pencil) and Delete (trash can) the style appear at the bottom of each style card.
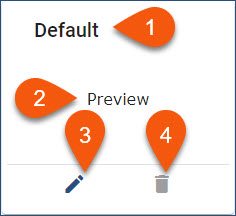
Using the graphic above, the numbered items are identified as follows:
1.Style Title. The Style Title (name) will display in the Paragraph drop-down list in the Content Editor pane. (See the Creating Content topic.)
2.Preview sample of how the style will display in the instruction frame.
3.Edit (pencil) icon displays the Style Editor to modify the style settings.
4.Delete (trash can) icon will delete the style.
![]() When you click the Delete icon, the style will be immediately deleted - NO confirmation warning will display.
When you click the Delete icon, the style will be immediately deleted - NO confirmation warning will display.
Important! Deleting a style will delete the style from ALL authors in the organization! |
1.Click the Menu icon on the Navigation bar. 2.Click the Style Manager item in the Menu panel on the left. |
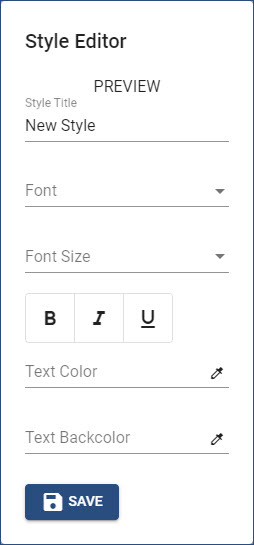
1.Display the Style Manager page. 2.Click the +ADD STYLE button. 3.The Style Editor dialog box displays. Select the appropriate settings for the style.
•The Preview area displays how the selected settings will display in instruction frames. •Click the Style Title line, and then enter the name for the style. •For both the Font and Font Size settings, click the arrow to select the appropriate option.
•Use the B, I, and U buttons to turn on Bold, Italics, and/or Underline, respectively. •For the Text Color and Text Backcolor, click the eye-dropper icon to set each color. If you know the HEX code, type it directly on the appropriate field, preceding it with the # symbol. (See the Setting Colors topic.) 4.Click the SAVE button to save the style.
|