Feature Enhancements & Bug Fixes 
Available Oct 9, 2025
NEW
The Outlook Decline feature allows enrolled users to decline LMS event invitations directly from Outlook or Microsoft Teams. When a user declines a calendar invite, the LMS automatically updates their enrollment status to Cancelled for the event. This streamlines the process of having to sign in to the LMS to cancel from the event. The Outlook Decline feature requires specific configuration within your organization. Please share the Outlook Decline Integration - Technical Requirement information with your technical team for review and to confirm compatibility with your environment.
How Users Can Decline EventsOnce enabled for your LMS, Users can decline an LMS Calendar invite using any of the following applications: •Outlook Desktop, Web, or Mobile •Microsoft Teams (Desktop, Web, Mobile) Supported ActionsUsers can use a range of Decline methods across applications, including: •Click Decline in the Calendar invite •Right-click and select Decline •Respond NO via RSVP options in mobile Outlook or Teams apps •Decline from Microsoft Teams Calendar  Outlook Decline  Teams Meeting - Right-Click > Decline When a decline is registered through any of these methods, the LMS will automatically update the User's status to Cancelled for the Event.
|

The Outlook Decline feature is currently supported in single-domain environments only and requires specific configuration within your organization. It is not supported in the following environments: •On-Premises Exchange Server Outlook Decline Integration - Technical RequirementsTo enable the Outlook Decline feature, the following configuration is required: 1.An Entra ID Application is required for integration. Verify whether an existing Entra ID Application is already in use. If not, create a new Entra ID Application. Note: This may need to be created by your organization but is often the same as used for SSO. 2.Provide the following Entra Application Details to Intellek: oTenant ID oClient ID oClient Secret Value 3.Ensure Proper Permissions. Grant the Entra Application the following Application permissions (not Delegated) with Admin consent: oMS Graph - User.Read.All oMS Graph - Calendars.Read Notes for Technical DepartmentMicrosoft Graph Permissions for LMS Decline Event FeatureBelow is an overview of the requirements and data flow for enabling the Outlook Decline Event feature within the Learning Management System (LMS). This functionality allows end-users to cancel their attendance by declining the corresponding calendar invitation in Outlook (desktop, web, or new versions) and Teams (desktop and web). Required Microsoft Entra Application PermissionsThis functionality is enabled by subscribing end-users to Microsoft Graph Events. To establish this subscription capability, the following Microsoft Graph Application (not Delegated) permissions must be granted to the Intellek Entra Application with Admin Consent:
Event Data FlowThe process for subscribing to and handling an end-user's decline action involves the following steps: 1.Subscription: Intellek subscribes the relevant users to Microsoft Graph Events. During this process, the Intellek Webhook API address is registered as the callback URL for any events raised by Microsoft Graph. 2.Event Creation: An LMS calendar event is created, and registered users are added to the event. 3.Unique ID Storage: The Intellek Webhook API recognizes that the event is an LMS Calendar event for a registered user and securely stores a unique event identifier in a simple Azure online Data Table. 4.Decline Action & Cancellation: When an end-user declines the calendar event in Outlook or Teams, the Intellek Webhook API is triggered. The Webhook API then retrieves the unique event identifier from the Azure Data Table and calls the LMS to process the user's cancellation for that specific event.
If you have any questions, please contact [email protected].
|
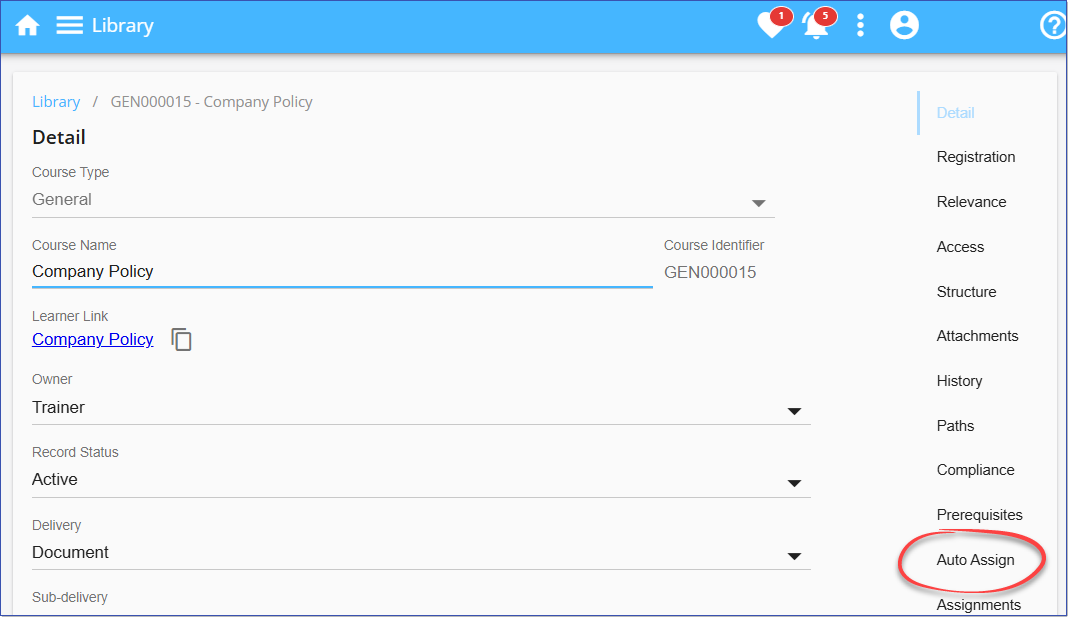
The Auto Assign feature is now available for individual Courses in the Library. Administrators can automatically assign one or more Groups to a single course, simplifying the process of enrolling multiple Users. The Auto Assign option is available from the Course Detail Page for General, AICC, and SCORM course types.
Auto Assign a Group to a Course1.Navigate to the Library and locate the Course. 2.Hover over the Course Card, and click the Edit record 3.On the Course Detail page, select the Auto Assign tab. 4.Select the Group(s) to be auto-assigned to the Course. 5.Choose an Expires option to control Course access: oNever (default) - The Course does not expire and stays available. oIn - Set the # of days after enrollment that the course remains available. oOn - Set a specific calendar date when access to the Course will expire. 6.Click Save.  Library > Course Detail > Auto Assign
|
When creating new Groups in the LMS, administrators will not longer be presented with the Available for option. All groups created will automatically be available for Relevance and Auto Assignment, no longer requiring the administrator to make a selection.  New Group dialogue |
The LMS has been updated to include new Dutch localizations: Dutch (nl) and Dutch (Belgium). As a result, users whose Windows language is set to Dutch will now experience these enhancements across the LMS interface. See Localizations for more details. |
ISSUES RESOLVED:
•SCORM Upload Error when <lom:title> element not supplied (21651, FisherP)
•When SCORM Interaction Analytics advanced search filter is applied, previous results for SCORM Interactions not cleared.
----------------------------------------------------------------------------------------------------------------
Any Issues listed below this line were added after Sept 26, 2025 when LMS v3.75.0.0 Release Notes were originally made available.
----------------------------------------------------------------------------------------------------------------