Intellek Create provides multiple methods for advancing content or moving to the next instruction frame. When providing learning (Lesson) or testing application knowledge (Assessment), "capturing" a step (e.g., an application command or control such as underline or applying a style) and the appropriate alternative(s) is the method used to advance the content. The Capture Utility is the means by which Intellek Create records ("captures") the steps you require your users to perform for a particular Text instruction frame. Form instruction frames should not have captured steps.
•Step: The primary or preferred method used to complete a task. •Alternative: Any additional method that will be allowed to complete the task defined in the step.
|
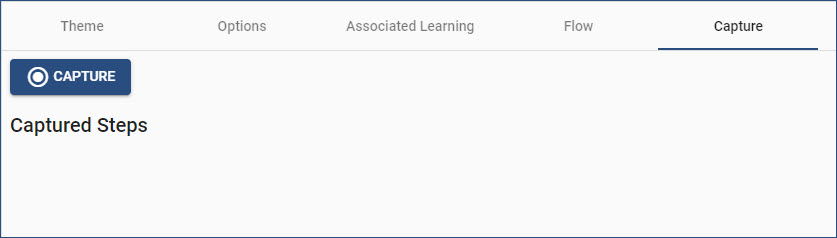
The Capture Utility is launched from the Capture property tab of an appropriate Text instruction frame in the Content Editor. Form and ScoreSheet instruction frames should not have captured steps. 1.From the Content Library, click the Edit icon for the required content file. 2.In the Instruction list panel, select the first Text instruction requiring a captured step. 3.Click the Capture property tab. 4.Click the CAPTURE button.
|
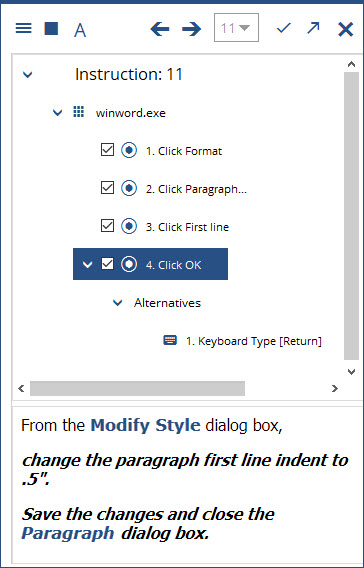
The Capture window opens as a panel on the right side of the screen. Initially, the Capture window will be the full height of the screen, composed of three components: the Capture toolbar across the top of the window, the Captured Steps and Alternatives in the middle, and the Active Text instruction frame at the bottom. Using the graphic for reference, the buttons on the toolbar provide the following functionality from left to right.
•Start/Stop capturing controls. By default, recording is stopped (the button is a circle). After clicking the Start/Stop button, the circle changes to a square. Click the Stop (square icon) button to stop or pause recording. •Add alternatives. Click the A button to record an alternative method for the selected captured step. •More capture options. Click the menu burger (three horizontal lines) allow you to select either Refine Capture or Refine Capture Relative. These options assist in capturing controls that might not be precisely identified in an application.
•Previous Instruction. Click to display the previous Text instruction frame. •Next Instruction. Click to display the next Text instruction frame. •Instruction Frame Selector. Use this box to enter an instruction frame number and jump directly to that instruction frame. •Finish (check/tick mark). Saves the captured steps and alternatives and closes the Capture window, returning to the Intellek Create web page. •Resize the Capture window to full panel height. The arrow will reverse to an downward pointing arrow (default size) to return the Capture window to full height.
•Close the Capture window without saving captured steps and alternatives. A warning message will display to confirm closing the Capture window without saving. |
The Capture window will open in Stopped mode (the circle button on the Capture toolbar). This allows an author to ensure the application window (e.g., Microsoft Word) is the focused (active) window and in the appropriate state to begin capturing steps and alternatives.
1.Click the Start button (circle icon) on the Capture toolbar to start capturing steps. See Capture Utility. 2.Click each application control (i.e., ribbon tab, button, right-click, or drop-down list item) or keyboard action in the appropriate sequence for the selected instruction frame.
3.To continue capturing for successive instruction frames: a.Click the Stop button (square icon) on the Capture toolbar. b.In the Capture window, select the next instruction requiring captured steps. c.Click the Start (circle icon) button on the Capture toolbar. d.Repeat Step 2. 4.The Capture window will show the steps and alternatives recorded for the selected instruction frame (refer to the graphic in the Capture Window sub-section). (See the Capturing Alternative Steps sub-section topic.)
5.When finished capturing, click the Finish button on the Capture toolbar. 6.Test your content. Use the Preview button to test. |
Capturing alternative steps is accomplished in much the same way as capturing steps. In order to capture an alternative step, first capture the primary (preferred) method as a step. When planning what alternative methods you will need to capture, keep in mind the following: •Consider always capturing these methods (Primary or Alternative) as appropriate: oRibbon command (mini-toolbar commands are often the same as ribbon commands, and therefore may not need to be captured as alternatives - test to confirm) oRight-click shortcut menu (if not on the mini-toolbar) oKeyboard shortcut ( •Focused Execution Buttons. Within many dialog boxes, be aware of "focused" (active) execution buttons. In other words, it is not uncommon that the OK or Save button is active by default, allowing savvy users to press the Enter key as an alternative to clicking OK or Save. This may also include clicking the X in the top right corner of a dialog box. 1.Select the step in the Capture Window. (See Step 4 in the Capture Window graphic.) 2.On the Capture Window toolbar, click the A (Add alternative) button. 3.Click the Start (circle icon) button on the Capture toolbar to start recording. 4.Capture the alternative step(s). The alternative(s) will display below the associated step.
Example: Saving a document in Microsoft Word can be accomplished in multiple ways: •Clicking the Save icon on the Quick Access Toolbar (Primary method) •Pressing Ctrl+S (Alternative 1) •Clicking File > Save (Alternative 2) •Clicking Shift+F12 (Alternative 3) Note that Alternative 2 would require two clicks to achieve the same result (display the File Explorer Save dialog box) as all the other methods. Since the only way to get to the Save option in Backstage view, is to first click the File tab, only clicking the Save option in Backstage view needs to be captured. 5.Once all alternative step(s) have been captured, click the Stop (square icon) on the Capture toolbar to stop recording.
6.Delete any unnecessary captured alternative steps. (Select the step, right-click, and then select Delete Del or press the Delete key). 7.Click the Finish (check/tick mark) icon on the Capture toolbar to save and close the Capture window. |
BalloonTips can be added or removed in either the Capture window or the Capture property tab of the instruction frame in the Content Editor. In the graphic on the right, the content file is an Assessment. If this were a Lesson, the Score setting would not be visible. BalloonTips should only be applied in Lesson content files.  Capture window
 Capture Property Tab •Select the check box to add the BalloonTip. •Clear the check box to remove the BalloonTip. BalloonTips are formatted on the Balloon Defaults tab in the Content Properties (cog) dialog box on the Content Editor Navigation bar.
|