Capturing alternative methods is accomplished in much the same way as capturing Steps. In order to capture an Alternative, first capture the primary (preferred) method as a Step.
Alternatives can be captured by first selecting the Step in the Main Interface, the Add/Edit Instruction window, or the Capture window.
1.Select the Step (NOT THE INSTRUCTION).

2.To capture an Alternative, either:
•In the Main Interface, right-click the selected Step, and then select Capture Alternative.
•In the Add/Edit Instruction window, right-click the selected Step, and then select Capture Alternative.
•In the Capture window, select a Step, and then click the ![]() button on the Capture toolbar.
button on the Capture toolbar.
3.Capture the Alternative action. The Alternative(s) will display below the associated Step.
You can capture any number of methods you require for your content. A Step can have multiple Alternatives.
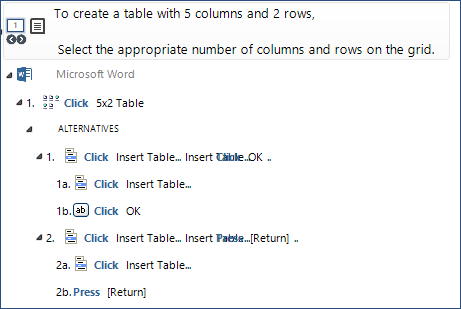
Sometimes Alternatives can be complex. Take the Instruction, "Save the changes to the document" as an example. The following methods would need to be captured: •Save button on the Quick Access Toolbar (Primary method) •Ctrl+S (Alternative 1) •File, Save (Alternative 2) •Shift+F12 (Alternative 3)
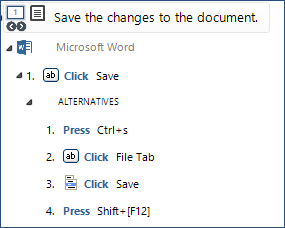
After capturing, the Steps would look like this:
As defined in this example, the end-user could either perform: •Primary Method: Click Save on the Quick Access Toolbar •Alternative Methods: 1.Press Ctrl+S 2.Click the File tab 3.Click Save in Backstage view 4.Press Shift+F12 to continue That is not the desired result since Alternative 2 (clicking the File tab) would not by itself have the same result as the other methods. HOWEVER, merging Alternatives 2 and 3 into a single Alternative with multiple actions, would have the same result (see Merging Steps and Alternatives). Another way to resolve this is to simply delete Alternative 2, since the only way to get to the Save command in Backstage view is to first click the File tab. Therefore, if the only way to get to the desired control is by clicking on a specific tab, then you may only need to retain the actual control, rather than every click to get to the control. For example, in Microsoft Word, to insert a Next Page Section Break, you only need to capture the Next Page Section Break option from the [Page] Layout tab > Breaks list, not each command to get there. |
Merging Steps or Alternatives can be accomplished from the Main Interface, the Add/Edit Instruction window, or the Capture window. 1.Select the Steps or Alternative Steps to be merged. 2.From the: •Main Interface, click the Merge/Unmerge the Selected Steps •Add/Edit Instruction window, right-click the selected Steps, and then select Merge Steps.
•Capture window, click the |
To unmerge Steps or Alternative Steps: 1.If necessary, expand the merged Steps. 2.Select the merged Steps. 3.From the: •Main Interface, click the Merge/Unmerge the Selected Steps •Add/Edit Instruction window, right-click the selected Steps, and then select Unmerge Steps.
•Capture window, click the |
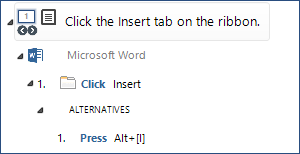
When planning what Alternative methods you will need to capture, keep in mind the following: •Consider always capturing these methods (Primary or Alternative) as appropriate: oRibbon command (mini-toolbar commands are the same as ribbon commands, and therefore do not need to be captured as Alternatives) oRight-click shortcut menu (if not on the mini-toolbar) oKeyboard shortcut •Focused Execution Buttons. Within many dialog boxes, be aware of "focused" (active) execution buttons. In other words, it is not uncommon that the OK or Save button is active by default, allowing savvy users to press the Enter key as an alternative to clicking OK or Save. This may also include clicking the X in the top right corner of a dialog box. As long as clicking OK or Save is not merged with another Step, pressing Enter should be an Alternative to the click action. •If clicking OK or Save is merged with another Step, merging the Step with pressing Enter must be a separate Alternative. The graphic below shows an example of this:
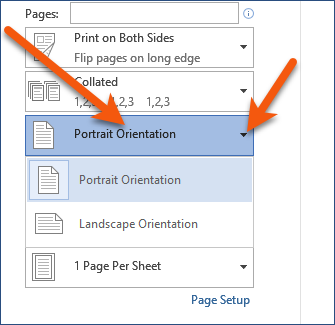
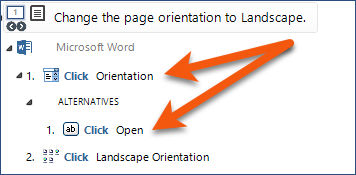
•Capturing Numbers. If you require users to type numbers, you will need to capture numbers from BOTH the top row of the keyboard AND the numeric keypad. •Button drop-down (selection) arrows. It is not uncommon for Live Content Studio to capture a drop-down arrow as "Open" or "Close," rather than the command with which it is associated. Since you cannot guarantee whether end-users will click on the button or directly on the drop-down arrow, you will need to capture both methods. For example, in the Print options, to change the Page Orientation, users can click anywhere on the button, including the arrow:
Capture both the button area AND the arrow:
•Tell me what to do (Office 2016/365). You will need to capture both the icon at the left AND whatever text is currently in the box. You may get different results each time you click the text, so consider wording your Instruction text to make sure users ONLY click the icon at the left of the field. |