If you plan on creating a Results File to track user results, you will need to first apply scoring to both captured Steps/Alternatives and to Form Instructions where concept questions are used. Scoring for captured Steps and Alternatives is applied using the Specify Content Scoring option in the Results tab. While scoring for Form Instructions can also be applied using Specify Content Scoring, it is better to apply scoring from within the Add/Edit Instruction window when the Form Instruction is displayed in the Edit Pane.
Scoring Steps and Alternatives is performed starting from the Main Interface. 1.Click the Results tab. 2.Click the Specify Content Scoring button.
The ribbon changes to include the: •Results Group. This group allows you to open up a Results File, or open the Results Viewer. oNavigation Group. This group simply allows you to Cancel out of the content scoring feature or to Accept any scoring you’ve set up. oAuto Score Group. There are four choices in this group: Preferred, 1st Alternative, 2nd Alternative and 3rd Alternative. These refer to the default base scores for each of those elements in your Instructions. By default: ▪Preferred is set to 10 ▪1st Alternative to 8 ▪2nd Alternative to 5 ▪3rd alternative to 4 These are simply suggestions, and you can adjust them however you see fit. If you want your Preferred method and your Alternate methods to be of the same value, change them here.
In the Content Pane, each Instruction as well as any captured Steps and Alternative Steps will be listed. The Scoring column on the left of each Instruction is where you assign scoring. •Click the Set Score link, to set an additional score for the Instruction itself, which need not be tied to any captured Step. •The numbers in the Auto Score group correspond to the fields to the left of your captured Steps and Alternatives in the Content Pane. You have the option to change the value of any of the individual Steps in the Content Pane. Use the spinner button next to each Step or Alternative Step to override the apply the number of points to be awarded for correctly performing the Step. For example, if one particular Step on a certain Instruction is far more important than any other in the content, you can adjust it to a higher value. Conversely, you may opt to not award any points for clicking OK or pressing Enter, so you would change the score next to that Step accordingly. Changing the values in the Auto Score group changes all of the corresponding fields in the Content Pane. So, if you change the Preferred value to 15, the value in all of the fields next to your Preferred captured Steps will adjust to that value automatically. This also sets the maximum allowable score for these steps. When you review the Results File, you’ll be able to adjust scores for each Step taken by a user up or down, if circumstances warrant, but you will not be able to increase them beyond this value. Form Instructions will have a button to the left labeled Form Scoring. Clicking on this will take you to the Form Scoring interface (same as clicking the Form Scoring button in the Add/Edit Instruction window) where you can adjust the score for that Instruction. Once you are done scoring that Form Instruction, you’ll be taken back to the main Scoring screen.
The check box next to each Instruction allows you to designate it as a New Section, same as you could do from the Flow tab in the Add/Edit Instruction window. |


It is best practice to wait to score Form Instructions until the content has been finalized and is ready to be published. You can access Form Scoring from more than one location. We recommend accessing it from the Add/Edit Instruction window. 1.Display the Add/Edit Instruction window. 2.Select the Form Instruction to be scored. 3.Click the Form Scoring button on the Quick Access Toolbar (just above the Instruction Panel). If a Form is not selected, the Form Scoring button will not display.
4.In the Scoring group properties, click the New Score link.
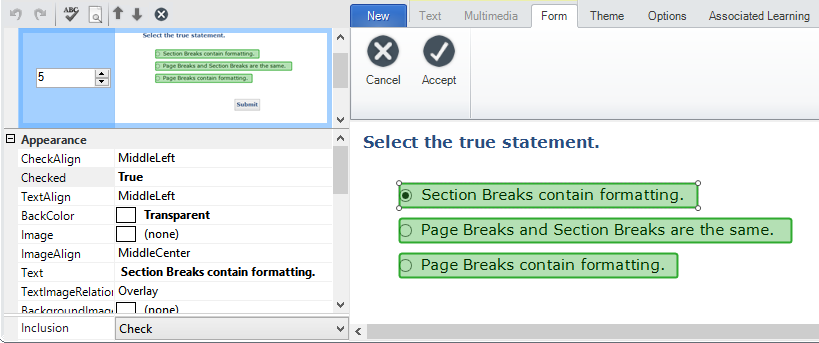
The Form Controls Panel, on the left, lists the configured scoring states and provides the control mechanisms for the Form. The Form Designer, on the right, displays the currently selected Form scoring state.
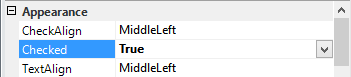
The Form Designer, on the right, displays the Form in its initial state. Fields with values available to contribute to the score are highlighted in green. (If the Form does not load completely, select the scoring state in the Forms Control Panel on the left, click the Delete scoring button on the Quick Access Toolbar (looks like the Cancel button on the ribbon), and then try again. 1.To indicate a correct response, click a green field in the right panel (you may only select one at a time, even if there are multiple correct answers). When a field is selected, the Field Controls are active on the left. 2.With a field selected, set the Checked property to True. This is located near the top of the Form Controls list.
3.The field to which this control applies should now show a check in the selected field. (This will not display to the user.) 4.Repeat steps 1 and 2 for each correct answer for this scoring state. 5.Click the Accept button on the ribbon to apply the configured scoring states. |


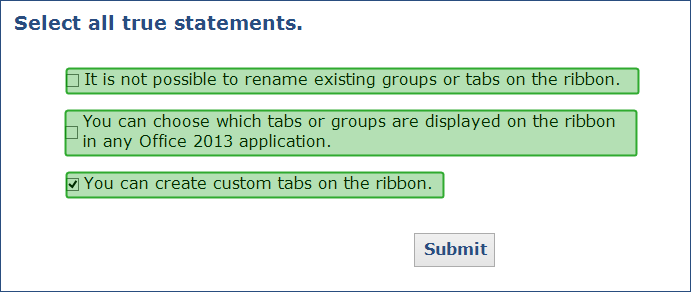
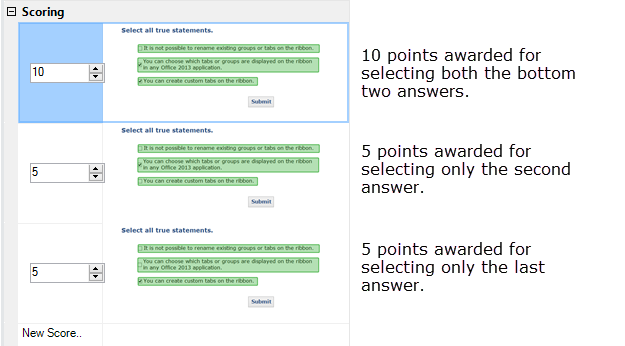
Why would you create multiple scoring states? Using the example below, the bottom two answers are both correct. If you require the user to submit both correct answers to get ANY credit for the Form, you would select each of the bottom two answers and set the Checked option to True.
If you will allow partial (in this example, half) credit for one correct answer, you would need to set two additional states, one for each single correct answer.
The three required scoring states for this question would be set as follows:
To set additional scoring states: 1.Click the New Score link and repeat the steps above. 2.To set the second field to be a correct answer, click the field to select it, and then set the Checked property to True. 3.To set the third field to be a correct answer, click the field to select it, and then set the Checked property to True. 4.Set the Score for each state using the spin buttons. 5.Click the Accept button on the ribbon to apply the configured scoring states.
|
1.Click the Select Score button in the Add/Edit Instruction window. 2.Click to select a scoring state on the left. 3.Click the X or Delete scoring button on the Quick Access Toolbar. 4.Reset the scoring states as required. |