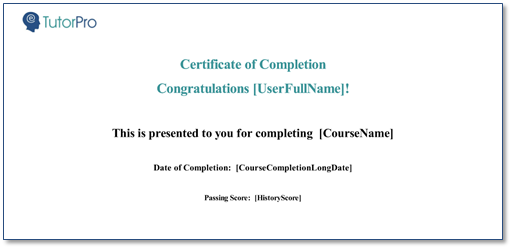
Certificates are actually Templates, allowing you the flexibility to apply the same Certificate to multiple Courses, Events, or Learning Paths as appropriate. By using variables, the appropriate data is pulled from the LMS and inserted when the Certificate is printed.
1.Navigate to the Calendar or Library.
2.Using the three dot Options menu, select Certificates.
3.Click the Add a new record ![]() button.
button.
4.Enter a Certificate Name using a name relevant to its use, such as Course Completion, Certificate of Attendance, or Required eLearning Course.
5.Click the Type arrow to select whether the Certificate is for Courses or Paths.
6.Set the Certificate Status to Inactive until it is ready for use.
7.Select the appropriate Page Size (Letter for US or A4 for UK/Europe).
8.Select the preferred Page Orientation (Portrait or Landscape).
9.Create and format the Certificate Body.
a.Type the text you want on the Certificate.
b.Format the text using the buttons and tools as described below (moving from left to right):
![]()
|
Source Code |
|
The Source button toggles the display to view the Certificate text as HTML source code. |
|
Undo/Redo |
|
Use as needed to undo/redo an action. |
|
Fullscreen/Exit Fullscreen |
|
Click the Fullscreen icon to maximize the editing area of the Certificate. When finished, click the Exit Fullscreen icon to see all Certificate detail options. |
|
Bold, Italic, Underscore, Strikethrough (Font Attributes) |
|
Apply Bold, Italics, Underscore, or Strike Through using the Font Attributes group of tools. |
|
Numbered List/Bullet List |
|
Add automatic Numbering or Bullets as needed. |
|
Text Alignment |
|
Apply text alignment settings (left center, right, or justify) to text as needed. |
|
Text and Background Colors |
|
Click the Text Color or Background Color buttons to display the color palette to change the text color and/or add a highlighted background color to text. |
|
Blocks |
|
The Blocks drop-down displays a list of Styles which can be applied to selected text. Use Normal to directly format text as desired. |
|
Fonts |
|
The Fonts drop-down displays a list of available fonts you can use. |
|
Font Sizes |
|
The Font Sizes drop-down displays available font sizes. |
|
Variables |
|
The Variables drop-down allows you to add User, Course, Compliance, Event, and/or History-related variables. For Learning Paths, variables are available for Users, Paths, or PathLearners (Path Completion Date). |
|
Insert Link, Insert/Edit Table, Insert/Edit Image |
|
Click the Link button to add a URL link. Click the Table button to insert or edit a table. Click the Insert/edit Image to insert an image. |
![]() Use the keyboard combinations for Cut (Ctrl+X), Copy (Ctrl+C), and Paste (Ctrl+V) as needed. (windows)
Use the keyboard combinations for Cut (Ctrl+X), Copy (Ctrl+C), and Paste (Ctrl+V) as needed. (windows)
10.OPTIONAL: Use the Header and Footer options to insert logos or graphics at the top and/or bottom of the Certificate.
a.Click the Header Style or Footer Style arrow to select the location to place an uploaded graphic:
•Banner will fit or stretch the uploaded graphic across the width of the page.
•Left, Right, or Centre will place the graphic at the selected location.
•Left/Right allows you to upload two of the same or different graphics, placed at the left and right margins.
•Left/Centre/Right allows you to upload three of the same or different graphics, placed at each location across the page.
b.Click the Upload ![]() icon to browse and navigate to and select the graphic.
icon to browse and navigate to and select the graphic.
11.Click ![]() to preview the Certificate to ensure correct format and spacing.
to preview the Certificate to ensure correct format and spacing.
![]() If there are any unsaved changes, you will need to confirm the Save message before the preview will display.
If there are any unsaved changes, you will need to confirm the Save message before the preview will display.
12.Click ![]() .
.
Important! Make sure to change the Certificate Status to Active in order to associate it with the appropriate Course, Event, or Learning Path! |