1.Navigate to the Communication page, and then select Send Email.
2.Select the type(s) of item(s) to be included in the message. Courses and Paths are resources listed in the Library, whereas Events are scheduled on the Calendar. The process is the same for each option.
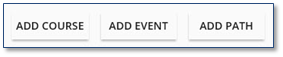
a.As appropriate, click the button corresponding to the item(s) to be included in the message:
b.Type one or more words in the title of the required items. Alternatively, click the Expand ![]() arrow to use the Search filter options.
arrow to use the Search filter options.
c.Click ![]() to execute the Search.
to execute the Search.
d.Select the check box(es) next to each item in the Search Results list to be included.
e.Click ![]() .
.
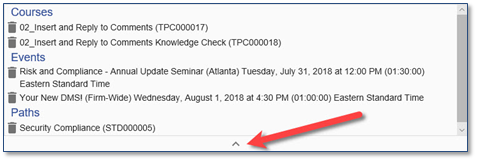
f.If many items of one or more types have been selected, click the Expand ![]() arrow to review all selected items and their type:
arrow to review all selected items and their type:
![]() To remove an item from the list, click the
To remove an item from the list, click the ![]() icon to the left of the item.
icon to the left of the item.
3.If desired, click the Template arrow to select an existing Email Template as a starting point for the message.
4.Click the From arrow to select the appropriate Sender and Email Signature as defined in Communications > Settings.
5.Select the addressees by clicking the ![]() next to the To area.
next to the To area.
a.Type one or more words of the required name. Alternatively, click the Expand ![]() arrow to use the Search filter options.
arrow to use the Search filter options.
b.Click ![]() to execute the Search.
to execute the Search.
c.Select the check box(es) next to each item in the Search Results list to be included.
d.Click ![]() .
.
e.If many names and/or groups have been selected, click the Expand ![]() arrow to review all selected users.
arrow to review all selected users.
![]() To remove a name from the list, click the
To remove a name from the list, click the ![]() icon to the left of the name.
icon to the left of the name.
6.Enter a Subject line for the message.
7.Type the Message text.
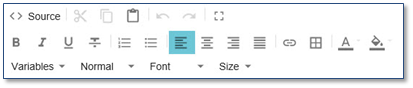
8.Click the variables tab to insert the required variables (if not already inserted from a Message Template).
![]() Make sure the appropriate Course/Path/Event Message variables are in the Message Text. See the Using email variables topic for detailed information.
Make sure the appropriate Course/Path/Event Message variables are in the Message Text. See the Using email variables topic for detailed information.
9.Format the message text using the appropriate commands in Message Formatting toolbar and tabs. Also add any punctuation, spacing, and text alignment as required.
10.Click ![]() .
.