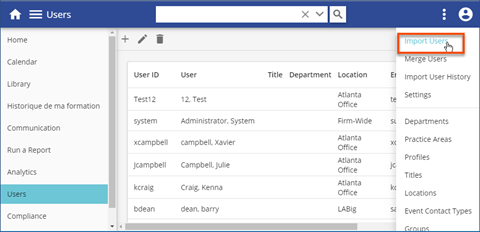
<< Click to Display Table of Contents >> Navigation: Getting started > Importing LMS user data |
Learner (user) information is the most important data you will add to the Intellek LMS. It is essential that the information be consistently formatted and applied. Inaccurate or inconsistent end-user data will result in inaccurate reporting and make assigning learning difficult.
Intellek provides each client with the Import_Learners.xlsx file to populate and use as the basis for the user import.
Your organization may choose to populate the Import_Learners.xlsx workbook from a parent database or databases (e.g., HRIS, Active Directory, InterAction). If the parent database or databases have consistently formatted data that is appropriate for the Learning Management System (LMS), that process can be automated by the appropriate network staff in your environment.
If the information provided from the parent database or databases requires cleanup or revision for use in the LMS, either the parent database will have to be revised or you may choose to do an initial data load from the parent database and then manually maintain or enter user data. You should make this decision from the beginning. It will impact the maintenance of the Import_Learners.xlsx file or the method you use for user account creation.
If you plan to maintain end-user data in the Import_Learners.xlsx file (whether manually modifying data or using a DTSX/SSIS package to populate it) you will maintain ALL active records in the sheet (new, modified, and inactive).
When you import via the file, any end-user previously maintained within the file, but no longer included, will be marked inactive in the LMS. Users that have been manually created will not be updated, unless you change their Entry Type to Automatic. This change is made at the bottom of the Detail page for the user.
The import file can be used as part of an automated process that will be set up by Intellek and/or you can manually load users into the system by selecting Import Users on the three dot Options menu on the Users page in the LMS.
You have three options for importing users to the LMS: 1.Provide the Import_Learners.xlsx file to Intellek as frequently as you need (e.g. daily or weekly) via the SFTP folder. Intellek needs to plan run the import at least two-hours after your file is placed on the SFTP server to be included in that day's import. Please let us know your scheduled time for file placement. You can also write scripts to collect and send that data automatically to our folder via SFTP if you like. If this is your preferred method, please send your correctly formatted Import_Learners.xlsx file (see the Required File Format for the Import Learners Sheet topic) to support@intellek.io so we can review the format for you. Once we have confirmed you have the correct format, we will introduce you to a team member to help you complete the steps required for SFTP. 2.Manually import the correctly formatted Import Learner Sheet (see the Required File Format for the Import Learners Sheet topic) via Users > Three Dot Options > Import Users.
3.For Clients with IT resources and a full understanding of API protocols, we recommend our Intellek API to automate the Learner import process without worrying about Import_Learners Sheets or SFTP. If this option is of interest to you, please review the API details/Instructions. Review the above API documentation and send your Request Body JSON object (pasted into a .txt file) in an email for Intellek to validate and approve before testing on your sandbox or live site. |
The Import_Learners.xlsx file must be formatted as either .xlsx or .csv. The file name MUST exactly match Import_Learners. Windows updates as of October 2017 no longer support .xls files.
Related Topics: |
You will need to populate the Import_Learners.xlsx template with the necessary User information. See the Understanding the Column Headers topic for detailed explanations of the data to be entered into the worksheet. Each of these columns map directly to User Detail fields in the User's LMS account.
Related Topics: |
To explain the Column Heading column details more clearly, the less obvious ones are outlined below.
|
A unique client identifier is optional but recommended. This is the primary key for the user in the LMS and can be anything such as Clock Number, SSN, Payroll Number, etc. This is the primary lookup value to determine if an existing user record is to be updated, or a new user record is to be created. If the Client_User_Identifier is left blank, it will be set to the User_Identifier (Column B) value. This is the Client User ID in the LMS User's Detail. |
The Mandatory User_Identifier column values will usually be the Windows (network) username of the user. This is the identifier (Username) that the user will use when logging into the LMS with credentials. This value MUST match your Active Directory/HR User name for SSO. This is labled as the Login Name in the LMS User's Detail. If you are hosted and you would like us to activate Single Sign On (SSO), please contact support@intellek.io. |
Optionally use unique codes for each of the following. Only recommended if your organization requires and differentiates the following codes from their descriptions.
•Title_Code •Profile_Code •Department_Code •Practice_Area_Code •Location_Code
If a code is not supplied, then the _Code field will adopt its corresponding Description value. Once a code is entered into the LMS, it cannot be updated. A _Description cannot be used across multiple _Codes and, likewise, a _Code cannot be used against multiple _Descriptions |
An optional field intended to store the User's job title. |
An optional field intended to store any identifying data not represented in other fields. |
An optional field intended to store the User's department. |
An optional field intended to store the User's practice area. |
A Mandatory field intended to store the User's physical location. This data is also used when scheduling events on the calendar. |
This Mandatory field stores one of two values: •A = Active. Active means the user can log into the system. •I = Inactive. Inactive means the user cannot log into the system (for example, this would apply to Users who have left the company). |
An optional field intended to store the User's telephone number. |
The Mandatory email address must be unique. Otherwise, not all features will be available to all users, including the CPD/CLE module, Outlook Integration and Course Broadcast Emails. |
Optionally include the dates the User started/left the company. •If using the .xlsx Import_Learners spreadsheet for user data import, the date format must be one that (*) responds to the regional date and time settings that are specified for the operating system
•If using the .csv Import_Learners spreadsheet for user data import, please use "yyyy-MM-dd" date format with the double quotes. |
An optional field that can be used to designate a User's supervisor or manager in the LMS. If this field is left blank, the Users's manager will default to System Administrator. To assign a manager, enter the Client_User_Identifier of the desired supervisor or manager in the Client_Manager_Identifier column of the User row. In the example below, Bob Babcock's Client_Manager_Identifier field has a value of RU4qxt, which designates Jill Clifford as his manager. Note: The Client_Manager_Identifier value can never equal the Client_User_Identifier value of a given User detail. This will create a circular reference error during the import process. |
Optional. Leave the SecurityProfileCode column value blank to automatically assign the Standard User profile.
Security Profiles control the various “permissions” given to each user in the LMS. These are usually set up when the user data is imported; however, you can also assign these manually. The features and functionality you and the other users see in the LMS will depend on what Security Profile(s) have been assigned. For a detailed list of permissions for each Security Profile, refer to the Security Profiles topic. The available Security Profiles and the required code abbreviation to be used in the SecurityProfileCode column are listed below.
Standard UserTo define a user as a Standard User in the Import spreadsheet, you will need to specify USER (previously USERSTD) in the SecurityProfileCode column.
Report Super UserTo define a user as a Report Super User in the Import spreadsheet, you will need to specify REPORTUSER (previously LEARNERRPT) in the SecurityProfileCode column. SupervisorTo define a user as a Supervisor in the Import spreadsheet, you will need to specify SUPERV (previously MGRUSR) in the SecurityProfileCode column. This profile was previously known as User Manager.
Event ManagerTo define a user as an Event Manager in the Import spreadsheet, you will need to specify EVENTMGR (previously MGRCLS) in the SecurityProfileCode column. Course ManagerTo define a user as a Course Manager in the Import spreadsheet, you will need to specify COURSEMGR in the SecurityProfileCode column. User ManagerOnce a user has been assigned to the Supervisor profile, you can login and manually assign them to User Manager to increase their privileges. Event AdministratorTo define a user as an Event Administrator in the Import spreadsheet, you will need to specify EVENTADM in the SecurityProfileCode column. Course AdministratorTo define a user as a Course Administrator in the Import spreadsheet, you will need to specify COURSEADM (previously ADMINCRS) in the SecurityProfileCode column. User AdministratorTo define a user as a User Administrator in the Import spreadsheet, you will need to specify USERADM (previously ADMINLEARNER) in the SecurityProfileCode column. Company AdministratorThis profile provides complete access to the system. To define a user as a Company Administrator in the Import spreadsheet, you will need to specify COMPANYADM (previously ADMINCOM) in the SecurityProfileCode column.
|