![]() The Event Contacts feature allows you to assign end-users (i.e., trainers, in-house speakers, etc.) who are identified as an Event Contact to scheduled training Events on the Calendar. In order to be assigned as an Event Contact, the user must have an active user account in the LMS and have an Event Contact type assigned in their user Details.
The Event Contacts feature allows you to assign end-users (i.e., trainers, in-house speakers, etc.) who are identified as an Event Contact to scheduled training Events on the Calendar. In order to be assigned as an Event Contact, the user must have an active user account in the LMS and have an Event Contact type assigned in their user Details.
Once your end-users have been imported into the LMS, if someone needs to be made available as an Event Contact (e.g., Trainer, Speaker, etc.), you can make that change from the Users page.
When Event Contacts are assigned to an Event (for more information, see the topic entitled: Scheduling Events), they will be sent an Outlook appointment for each Event to which they are assigned. They are also listed in the Event details.
By default, there are three Event Contact roles defined in the LMS: Event Coordinator, Speaker and Trainer. You can create additional Event Contact types for your environment, if needed. See the Creating Event Contact Types topic.
![]() Event Contacts cannot be assigned or maintained in the Import_Learners process. To assign and/or maintain Event Contacts, you must have the appropriate Security Profile permissions to edit user accounts.
Event Contacts cannot be assigned or maintained in the Import_Learners process. To assign and/or maintain Event Contacts, you must have the appropriate Security Profile permissions to edit user accounts.
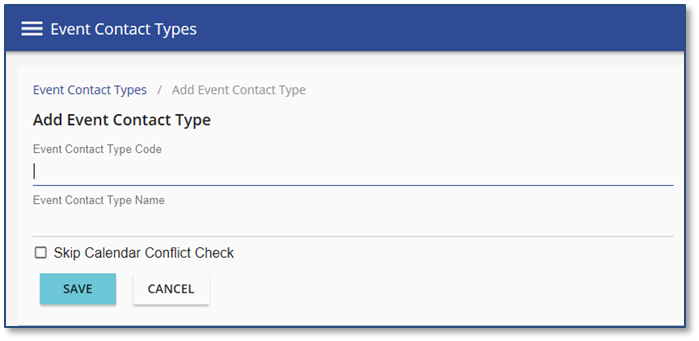
If the three default Event Contact Types provided in the LMS are not sufficient for your needs, you can create additional Contact Types in the Event Contact Type Manager.
1.Access the Users page in the LMS. 2.Select Event Contact Types from the three dot Options menu. 3.Click the Add a new record 4.Enter a unique Event Contact Type Code.
5.Enter the Event Contact Type Name.
6.Check Skip Calendar Conflict Check if the user can be scheduled as a contact for simultaneous events. When checked , no conflict check occurs and no warnings display for overlapping events. 7.Click |
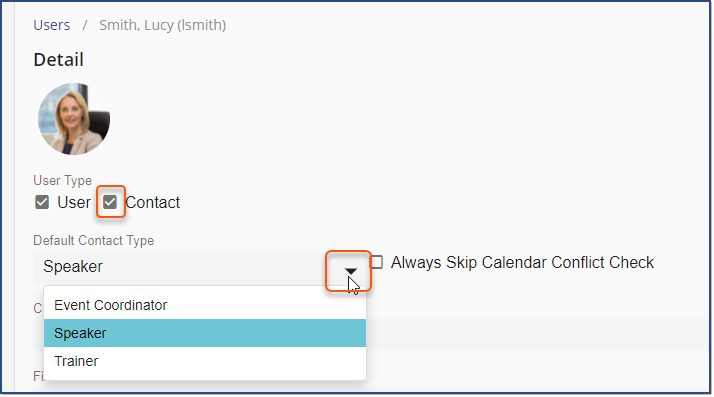
1.Navigate to the Users page. 2.Search for and select a User. 3.Click the Edit record 4.Under User Type, select the Event Contact check box.
5.Click the Contact Type arrow to select the appropriate Contact Type.
6.If appropriate, select the Always Skip Calendar Conflict Check check box.
7.Click |
1.Navigate to the Users page. 2.Search for and select a User. 3.Click the Edit record 4.Next to User Type, clear the Event Contact check box.
5.Click |
