From the Library page: Select the three dot Options menu and select Settings. Detail oCourse is shown as New/Updated for X days: enter the desired number of days for New/Updated Courses to be displayed. New & Updated on the Library is designed for end users and lets them know when online content has been added or updated. Other changes are not included as they are not relevant to the end user experience if, for example, a course name changes or the duration is updated oHide categories on search: choose whether or not to Hide categories by default on searching the Library. Users will always be offered the option to toggle Hide/Show manually. Enrollment oChoose whether or not to Prompt users when they've already taken an online course Rating (see the Activating the Rating Feature topic for full details): oIf desired, select the Allow users to rate Courses and Paths check box. ▪Feedback is required when rating is less than: select the number of stars for required Feedback. oChoose whether or not to Show user info in approved ratings results. Surveys o Select who to Show user information in reports to by selecting Admins only or All report users.. Paths If desired, you can upload a different graphic to be displayed for Learning Paths in the Library: (See LMS Image Guidelines for recommended image size). oClick the Upload file oClick oClick Open. oClick oClick Course Interest Users can register their interest in a course in multiple ways. Once a certain number (threshold) of users have registered interest, an email can be automatically sent to the course owner to notify them of interest in their course. Enable Send email when threshold is reached to turn on the feature. oDefine the number of interested users required to prompt an email by setting the Interested Threshold within each course in the course Detail. oWhen Send email when threshold is reached is enabled but no course-specific Interest threshold has been set, you can globally prompt emails by: ▪enabling Use default threshold below if not set in course and entering a Threshold number of interested users in the Threshold field. Use Images in Categories is on by default. oWhen enabled initially, all categories will display the Intellek default image. Uncheck to disable the setting and render all categories without an image:
oDefault Image ▪When Use Images in Categories is enabled you are given a choice of which default image is preferred. An Intellek image: Click the library ▪Select Custom Image and upload oPreview and
|
|
|
Course Categories and Subcategories are used to organize the Library in a structure that is easy for end-users to locate Courses and Resources housed in the LMS. You can create as many Sub and Sub-Subcategories as desired. Keep in mind that the more levels you create, the deeper end-users may need to dig in order to locate the desired Course or Resource. From the Library page: 1.Select the three dot Options menu. 2.Select Categories.
|
From the Library page: 1.Select the three dot Options menu. 2.Select Course Types. The list of available Course Types in the LMS is accessed here. Course Types define how the Course can be used.
You can create your own Course Types, but we highly recommend using the Course Types that are already available. If you have the need for another Course Type, please contact [email protected] before adding to the list. |
From the Library page: 1.Select the three dot Options menu. 2.Select Deliveries or Sub-deliveries. Each Course Type has associated Deliveries and Sub-deliveries. You can remove any Deliveries or Sub-deliveries that are not appropriate for your environment. However, remember that these are associated with specific Course Types. Deliveries and Sub-deliveries are searchable by all users of the LMS and will help you leverage the materials you make available. The Deliveries page provides the ability to upload a graphic to be associated with each Delivery type.
|
| Account Self-Creation |
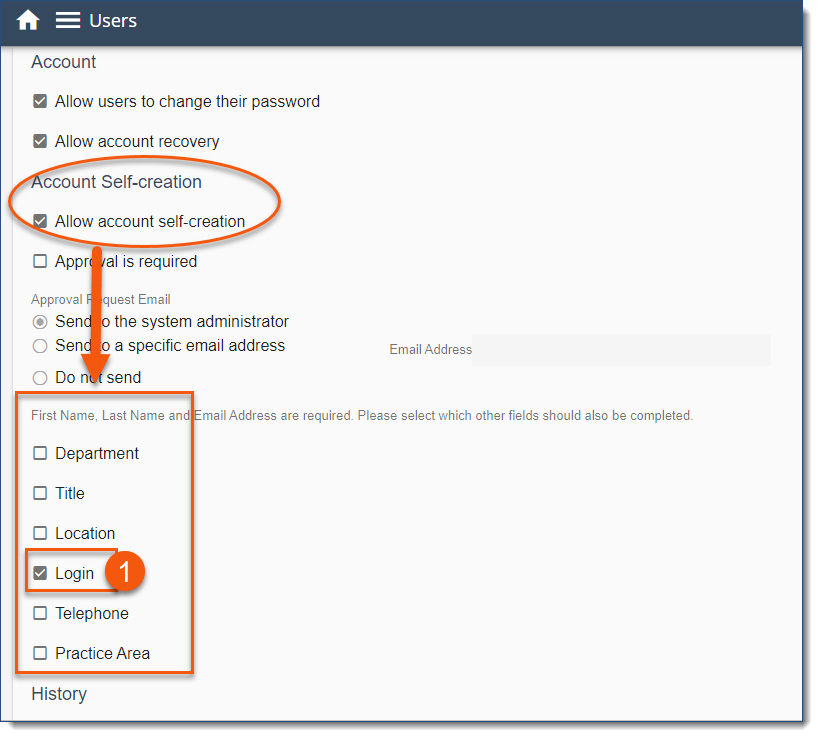
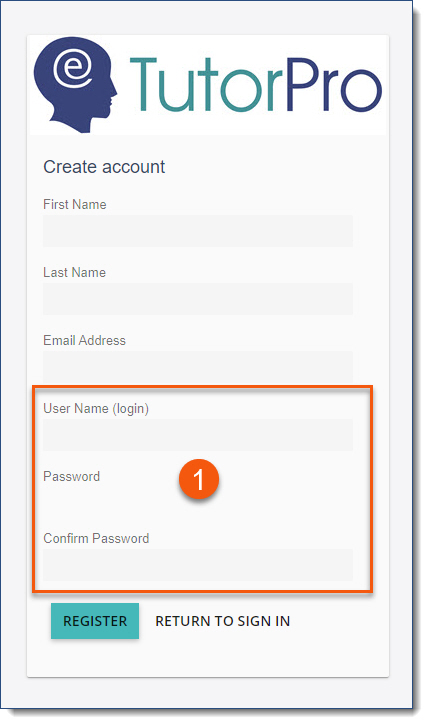
For clients allowing users to self-create LMS accounts, we've now provided configuration options in Users > Settings for what must be defined at the time of account creation. Configuration options include: •Department •Title •Location •Login (Including Login ID & Password) •Telephone •Practice Area
|
|


