The Groups and Access Manager features allow you to name and define parameters based on User Details. By defining the parameters, group membership is automatically and dynamically maintained by the LMS.
Groups can be used to auto-assign Learning Paths and/or define Relevance to Courses, control Registration Rules for scheduled training Events, and News messages.
By default, the group Everyone is associated with and available to all end-users for all Courses, Learning Paths, and News messages. This group cannot be edited or deleted. In order to associate and/or restrict access to Courses, Learning Paths, and/or News messages to a specific audience (e.g., Attorneys, Managers, Secretaries, etc.), create Groups.
![]() End-users must first be imported from the Import_Learners process before you can create Groups.
End-users must first be imported from the Import_Learners process before you can create Groups.
![]() You must have a Security Profile of User Administrator or Company Administrator in order to create and manage Groups.
You must have a Security Profile of User Administrator or Company Administrator in order to create and manage Groups.
It is important to consider how Groups can be used in the early stages of your LMS configuration process. As you add Courses to the Library, create Learning Paths, and News messages, associating the appropriate audience as you build your resources will automatically align the relevant resources to end-users for you.
There are two types of Groups that you can create for use in the LMS:
•Groups are used for specifying the Relevance of Learning Paths and Courses in the Library, and News messages to a group of end-users.
All users can see and search for all Courses and Learning Paths in the Library. End-users will see all News messages as long as the Message is active and the Relevance is set to Everyone and/or a Group of which they are a member.
•The Access Manager is used to create Groups in order to hide Courses and/or Learning Paths from everyone EXCEPT those end-users in the associated Access Group(s).
By default, Access Manager has four (4) predefined groups based on user’s Security Profile(s): All users (Standard User), Company Administrators, Course Administrators, and System Administrator. These groups cannot be edited or deleted.
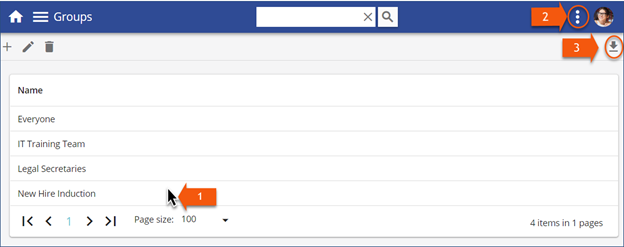
1.From the Library, or Users page, click the three dot Options menu, and then select Groups or Access. 2.Click Add a new record 3.Complete the Group Name field. 4.Select the Available for option(s).
5.Click 6.By default, All Users will be specified as the criteria. Click Add a new record
7.Select the appropriate criteria in the Add Parameter(s) dialog box: a.Parameter Name – click the arrow to display a list of fields that are available in the User Details. b.Value(s) – click the arrow to display the list of associated values for the selected parameter. You can select more than one.
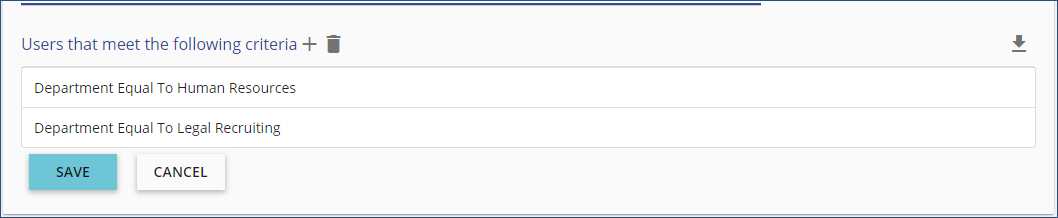
This group will include anyone in EITHER the Human Resources Department OR Legal Recruiting Department. a.Click 8.You can add parameters to the Group by repeating Steps 5 and 6. When you add a parameter to a Group, you are setting an AND statement.
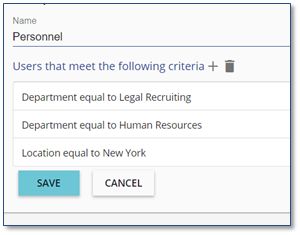
AND Parameter = Location The group will now consist of anyone in EITHER the Human Resources OR Legal Recruiting Departments in the New York Location. In other words: Multiple VALUE(S) for a Parameter = OR
9.When all parameters have been added, click Once the Group criteria has been saved, the Group will be available for use on either the Relevance tab for Courses and News messages, and/or the Auto Assign tab for Learning Paths, based on the options selected in Step 4. |

Parameter Import is available to Company Administrators. When viewing Groups/Access, select an item in the list, click the 3 dot option menu and choose Import Parameters. This 3 dot menu item is also available from the Group/Access Detail.
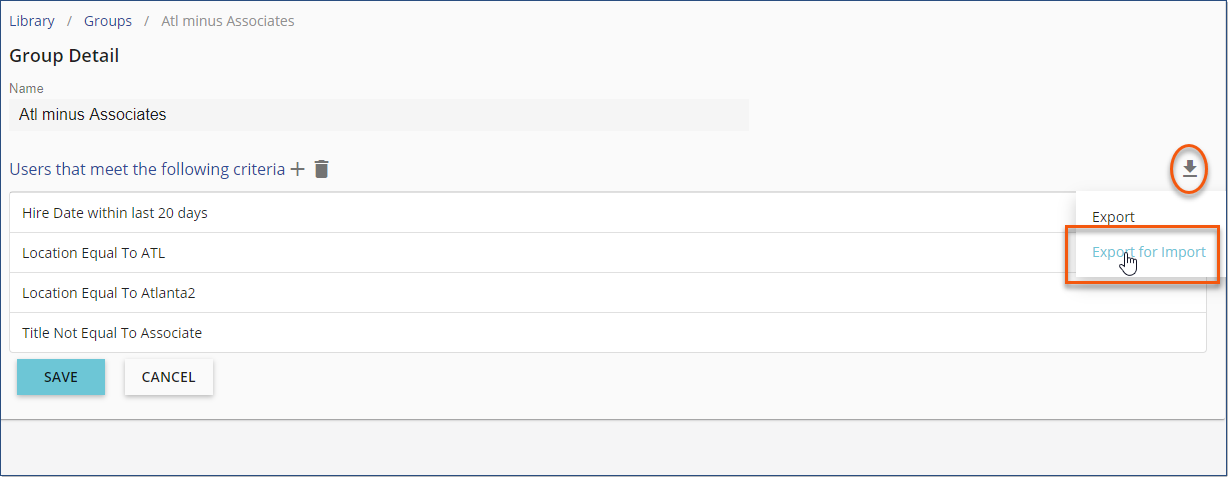
Click a Group to open the detail. Export offer 2 options:
1.Export – This is the standard export file that the other Security Profiles receive when they click the download button 2.Export for Import – This will output the parameter data in a format that can be used to import to another Group/Access.
The Export to .csv has not changed for users that don’t have the Company Administrator profile assigned.
Update the exported file to reflect the parameters you'd like to import to a Group/Access Group. Importing Parameters will delete all existing parameters and replace with those supplied in the import file. If there are any problems along the way the import will be aborted and the Group/Access item will retain its original parameters.
ColumnsParameterName – Required for all rows. Possible values are: •Department •StartDate •EndDate •StartDateWithinLastXDays •Location •PracticeArea •SecuritytProfile •Title •Profile •UserID
ParameterOperator – Required for all rows. See explanation below under the Parameters heading for information on which operators can be used with which ParameterNames •eq – Equal To •ge – Greater Than or Equal To •le – Less Than or Equal To
ParameterStringValue – Required for the following ParameterNames: •Department •StartDateWithinLastXDays •Location •PracticeArea •SecuritytProfile •Title •Profile •UserID
ParameterDateValue – Required for the following ParameterNames: •StartDate •EndDate
Description – Not required, simply provided to make sense of the Export for Import file
Parameter Operators
Parameters
Department, Location, PracticeArea, Security Profile, Title, ProfileoParameterOperator is eq or ne oParameterStringValue will be the [item]Code, so DepartmentCode, LocationCode, etc oParameterDateValue will be omitted
UserIDoParameterOperator is eq or ne oParameterStringValue will be the users’ Client User Identifier oParameterDateValue will be omitted
StartDateoParameterOperator is ge or lt oParameterStringValue will be omitted oParameterDateValue will be the desired date
EndDateoParameterOperator is le or gt oParameterStringValue will be omitted oParameterDateValue will be the desired date
StartDateWithinLastXDaysoParameterOperator is ge or lt oParameterStringValue will be number of days (x) oParameterDateValue will be omitted |
You can easily view the members assigned to a Group. Groups are accessed from the three dot Options menu on either the Library or Users page. 1.Select the appropriate group by clicking in the line with the Group name (in any space that does not have text). 2.Click the three dot Options menu, and then choose View Members. 3.If required, you also have the option to Export (
|
Groups can be edited as required. If the Group is being used for Relevance, modifications will dynamically impact the results when an end-user selects Relevance to view Events on the Calendar, search for Courses in the Library, or view active News messages. If the Group is auto-assigned to a Learning Path, modifications to the Group will NOT impact anyone to whom a Learning Path is currently assigned. Changes to the Group will only impact Users that are auto-assigned after the modifications are made. 1.Access the list of Groups. 2.Select a Group by clicking on the Group Name or by clicking in the line with the Group name (in any space that does not have text) and then click Edit record 3.From the Group Details window: •View the Group parameters. •Click Add a new record •Click Delete the selected item(s) 4.Click |
Access Groups allow you to create groups to be used in situations where a very limited group of end-users should have access to Courses and/or Learning Paths in the LMS. Examples include: •Allow Trainers or IT Staff access to eLearning Courses or other resources in preparation for a new application or rollout. •Courses with confidential or information specific only to attorneys or management staff. Assigning an Access Group (and not including the All Users Access Group) effectively and easily hides the Course or Path from all end-users EXCEPT members of the assigned Group. Non-Group users will not see the Courses in the Library, Events on the Calendar, nor be able to search for the Course/Path. Creating an Access Group is accomplished by following the same steps as Groups, but must be done from the Access Manager. Access Groups will only display on the Access tab of a Course and/or Learning Path. They do not display in the Relevance or Registration tabs of Courses, Events, or Paths. |
1.Navigate to the Library page, and then select Access from the three dot Options menu.
2.Click Add a new record 3.Complete the Access Name field. 4.Click 5.Click Add a new record 6.Select the appropriate criteria in the Add Parameter(s) dialog box: a.Parameter Name – click the arrow to display a list of fields that are available in the User Details. b.Value(s) – click the arrow to display the list of associated values for the selected parameter. You can select more than one. 7.Repeat Steps 5 and 6 to add additional Parameters. Refer to the steps for Adding a New Group for more information. 8.Click |