You can edit an Event after it has been added to the Calendar by displaying the Event Details and adding or modifying the appropriate information.
Important! Keep in mind that modifying information in an Event that is already on the Calendar may initiate an email to any users that are currently enrolled! See Outlook Updates for Enrolled Users. |
1.Navigate to the Calendar. 2.Locate and click the Event on the Calendar.
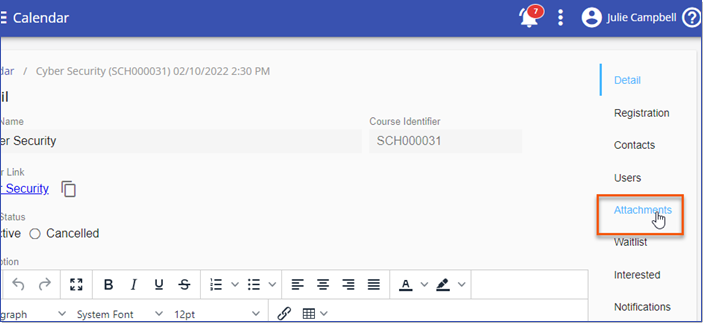
3.Click the appropriate tab(s) on the right side of the page to modify or add information as needed. a.Detail – Contains the basic information for the Event, such as Event Name, Event Start Date/Time, and Status (Active or Canceled), and more. If you modify information on the Detail tab, users will receive an Updated Event Appointment from the LMS. See the Scheduling an Event topic for specific instructions. i.Add, modify, or remove Locations and/or Venues, if required. ii.If you want to add a Webinar, select the Include webinar check box at the bottom of the page and then complete the webinar details. iii.If you want to add a Post-Event Survey, select the appropriate Survey using the Survey arrow.
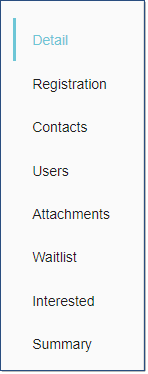
b.Registration – Contains the enrollment rules for the Event. The rules can be modified, if required. c.Contacts – Allows you to add or modify any Contacts associated with this Event. d.Users – Displays any users that are currently enrolled and allows you to enroll additional users to the Event, remove (cancel) users from the Event, or record user attendance to the Event. See the Enrolling users into an Event topic. e.Attachments – Allows you to upload documents, such as handouts or job aids associated with a Scheduled Event. See the Using Attachments topic. f.Waitlist - (if enabled) Lists any users who have requested a place on a full Event's Waitlist. When/if a seat becomes available (an attendee cancels, or admin makes room by either canceling others or increasing capacity) then the user at the top of the wait-list is automatically enrolled if automatic enrollment is enabled. The user is sent an email at that time stating that they are enrolled with an option for them to cancel if needed. Report on waitlisted users via the Training Tracking Report by selecting "Waitlisted" from the History Status > Open drop down. g.Interested – Lists any users who have been Registered Interest for scheduled course associated with the the Event. Users who request a seat for an Event that has no available seats will be offered a place on the Interested list if a seat for the requested event does not come available. Report on Interested users via the Training Tracking Report by selecting "Interested" from the History Status > Open drop down. h.Summary – Displays the summary view information that would be seen by a standard user viewing this Event on the Calendar or in the Upcoming Events section of the Home Page. |
Attachments allow you to upload documents, such as handouts or job aids associated with a Scheduled Event. Users will be able to display and download the attachments from the Event Summary. Additionally, attachments can be included in the Event Broadcast message template (Communication > Email Templates) or an ad hoc email to users (Event Edit > Users > Send Email
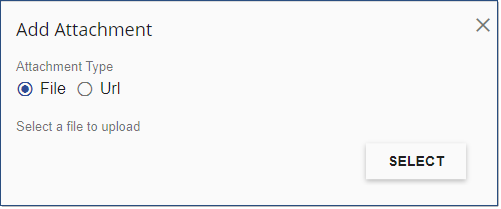
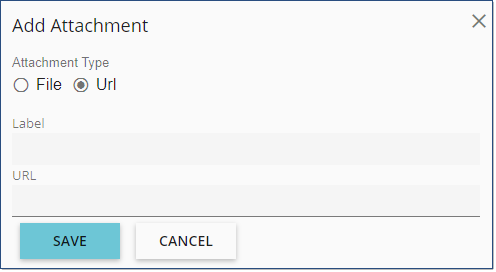
1.From the Event Details page, click the Attachments tab. 2.Click Attachments a.File
i.Click ii.Select the file, and then click Open. iii.Click b.URL
i.Provide the label for your new hyperlinked URL. ii.Enter the full URL of the attachment. iii.Click
|
1.Navigate to the Calendar. 2.Locate and click the Event on the Calendar. 3.On the Event Detail tab, scroll to the Location(s) section. 4.Click Edit record 5.In the Edit Location window, change the Event size (capacity). 6.Click |
1.Navigate to the Calendar page. 2.Locate and click the Event on the Calendar. 3.On the Event Detail tab, scroll to the Webinar details section. 4.Revise the number in the Capacity box. 5.Click |
| Copying an Event |
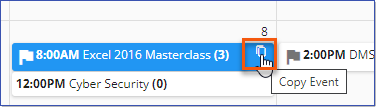
Existing Events can be copied for modification and saving as an independent event in the calendar. All Event settings and parameters including Attachments are copied over except aligned users and the user data. 1.Navigate to the Calendar. 2.Locate an Event on the Calendar. 3.Hover over the right of the Event Name and click on the Copy icon.
4.Make any necessary modifications to your new copied Event. When the Copy Event feature is used, any aligned Event Attachments will be copied over to the new Event.
5.Click SAVE. |